Software
Recover, our data recovery software
Deleted files, a formatted drive or a lost partition: with Recover you get data back yourself. Free, for Windows, macOS and Linux. The source drive is only ever read, never written to.
Recovery
Hard disk and SSD HDD, SSD, external drives, flash cards RAID, NAS & SAN All levels, all controllers, virtualisation Smartphones and tablets iPhone, Android, iPad, Huawei Tapes LTO, DAT, DLT and older formats
Access after signing in.
EN · RU · ZH · ES
Software
Deleted files, a formatted drive or a lost partition: with Recover you get data back yourself. Free, for Windows, macOS and Linux. The source drive is only ever read, never written to.
Recover is software by Datarecuperatie for recovering files from hard drives, SSDs, USB sticks, memory cards and disk images. It is meant for logical problems: files that were deleted, a drive that was formatted, a partition that disappeared.
The most important rule is built into the software: the source drive is only ever read. You always write recovered files to a different drive.
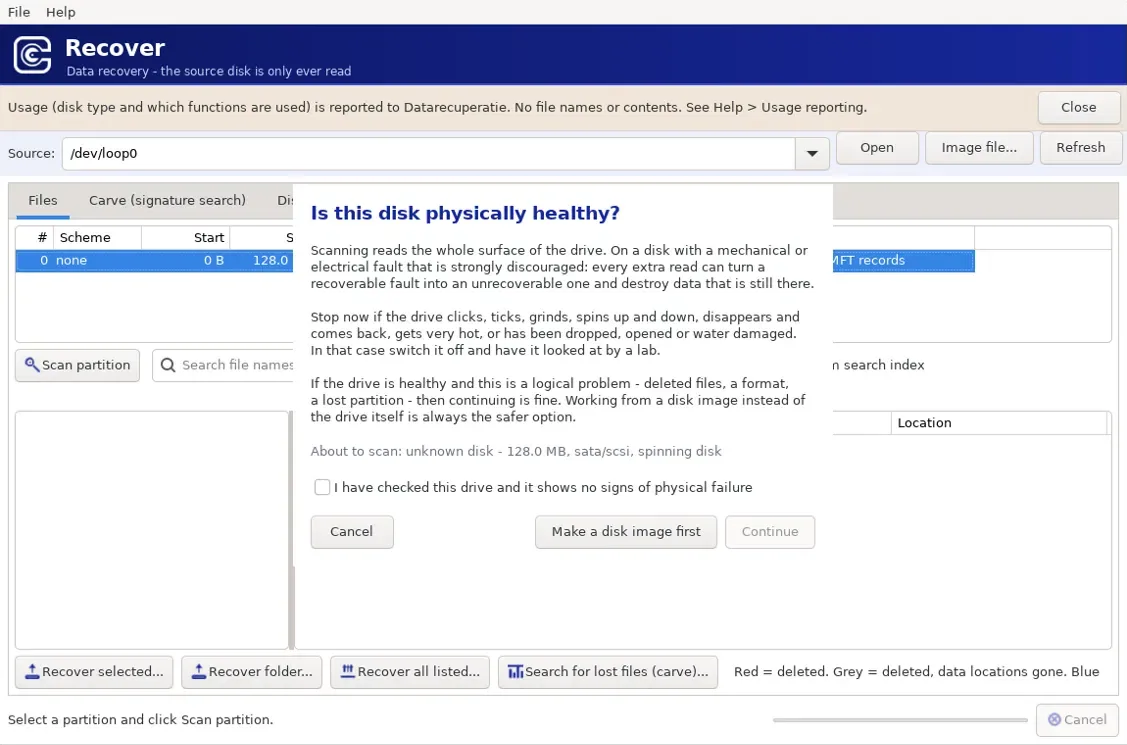
A scan reads the entire surface of the drive. With a mechanical or electronic fault, that can cause exactly the damage that makes data unrecoverable. That is why Recover explicitly asks, before every scan, whether the drive is physically sound.
If the drive clicks, ticks or grinds, disappears and comes back, gets very hot, or has been dropped, opened or water damaged, stop right away and have it checked by a lab. If the drive is healthy and the problem is logical, you can continue. Safer still is to make a disk image first and work from that: Recover offers that choice straight away.
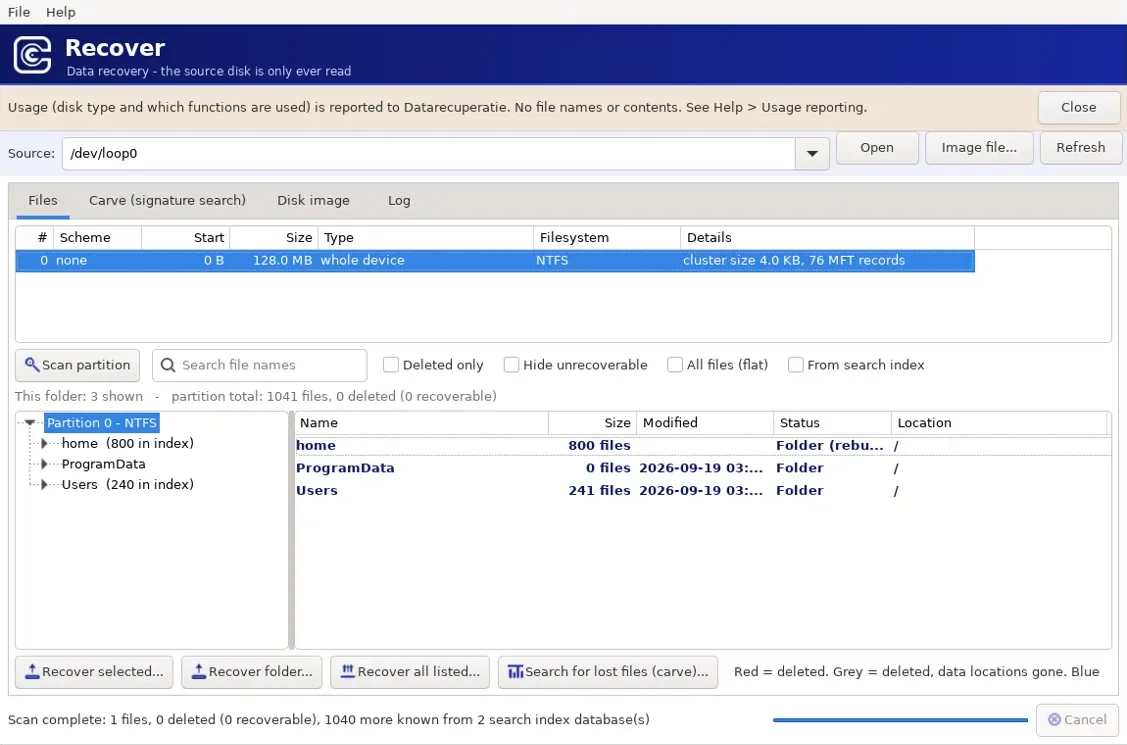
Read partitions and the file system, find deleted files and filter them: deleted only, hide unrecoverable, everything in one list, or supplemented from the search index. Recover per file, per folder or the whole list.
Where the file system no longer knows anything, Recover searches for files by their recognisable headers and structure (file carving).
Make a full copy of the drive and continue working on that, so the original drive is stressed as little as possible. Recover also opens existing image files.
During a scan, Recover reads the file system structures, such as the Master File Table (MFT) on NTFS, and shows the records of deleted files alongside the existing ones. Whether a deleted file can still be fully recovered depends on whether the location of its data is still known and has not been overwritten.
File carving works without a file system: it searches the drive for known file headers and structures. That way it finds files after heavy damage or formatting, but without their original name or folder.
The Windows search index stores file names and paths in its own databases. Recover uses them to rebuild the folder structure.
| File system | Where you find it |
|---|---|
| NTFS (including LZNT1 compression) | Windows |
| ReFS | Windows Server, Storage Spaces |
| FAT12, FAT16, FAT32 | USB sticks, memory cards, older systems |
| exFAT | memory cards, external drives |
| ext2, ext3, ext4 | Linux, many NAS devices |
| XFS | Linux servers, NAS |
| Btrfs | Linux, Synology and other NAS devices |
| APFS, HFS+ | macOS |
Recover reports to Datarecuperatie which kind of drive is used and which functions are used. File names, paths and file contents are never sent. That is also stated at the top of the software window.
In the settings you see exactly what a report looks like before it is sent. Including the drive serial number is a separate choice, and reporting can be switched off completely.
Software helps with logical problems. With a physical fault it does more harm than good. Have the drive checked in these cases:
Recover is free, for Windows, macOS and Linux. Choose the version for your system.
Right-click the file and choose "Run as administrator".
Make the file executable first (chmod +x), then start it with sudo -E.
Do not install Recover on the drive you want to recover data from, and always write recovered files to a different drive.
To read physical drives, Recover needs elevated rights: administrator on Windows, root on macOS and Linux. Without them you see no drives, only image files.
Right-click Recover-gui.exe and choose "Run as administrator". The UAC prompt appears anyway, because Recover requests elevated rights itself. Without them you see no physical drives.
Command line: first open an administrator prompt (right-click Windows Terminal or cmd, "Run as administrator"), then:
recover-cli.exe devices
recover-cli.exe info \\.\PhysicalDrive1
recover-cli.exe ls \\.\PhysicalDrive1 --deleted
Drive names: \\.\PhysicalDrive0, \\.\PhysicalDrive1, … for whole drives, \\.\E: for a single volume.
Once, beforehand: give Terminal Full Disk Access (System Settings → Privacy & Security → Full Disk Access) and restart Terminal. Then start Recover from Terminal:
sudo /Applications/Recover.app/Contents/MacOS/RecoverBefore scanning: find the drive and unmount it.
diskutil list
diskutil unmountDisk /dev/disk2
sudo ./recover info /dev/rdisk2        # command line
Do not double-click and do not use "sudo open -a": the app would then run as your user and the drive list stays empty. Keep Terminal open while the app runs.
Choose /dev/rdisk2, with the r: that is the raw device, which reads much faster.
chmod +x Recover-gui-linux recover-cli-linux-static    # once after download
sudo -E ./Recover-gui-linux                            # -E keeps your DISPLAY
sudo ./recover-cli-linux-static info /dev/sdb
Without -E the graphical version may not start, because root does not know your graphical session. Alternative without sudo: add your user to the disk group (sudo usermod -aG disk $USER), then log in again.
Drive names: /dev/sda, /dev/nvme0n1 for whole drives, /dev/sda1 for a single partition.
Images need no elevated rights. If you work on an .img file, simply double-clicking or starting without sudo is enough.
The recommended way remains: first make an image (Disk image tab, or from the command line), then work on that file. Every scan then reads the healthy copy instead of stressing the drive again.
recover image /dev/sdb copy.imgAlways recover to a different drive than the original.
When Recover runs as root, the settings (including usage reporting) end up in root's home folder: /var/root/.config/recover/ on macOS, /root/.config/recover/ on Linux, and %APPDATA% of the elevated account on Windows. What you set in the menu therefore applies to the sessions you actually work in, but not to a start without elevated rights.
Handy to set up on macOS and Linux:
echo 'alias recover-gui="sudo /Applications/Recover.app/Contents/MacOS/Recover"' >> ~/.zshrc   # macOS
echo 'alias recover-gui="sudo -E /path/to/Recover-gui-linux"' >> ~/.bashrc # LinuxFor Windows, macOS and Linux. If your drive is physically failing, or the risk is too high, request a free analysis.